Using Selenium for Web Automation? Let UFT Pro (LeanFT) help you!
Using Selenium for Web Automation? Let UFT Pro (LeanFT) help you!: Intro Selenium is a widely used, cross-platform, open-source framework for web application automation. Selenium’s core feature is its WebDriver API, which allows the creation of tests (scripts) in various programming languages, and run them on various browsers. HPE UFT Pro (LeanFT) is a functional...
Wait for Pop-up

In recent past, I encountered one scenario where you need to automate pop-up in the application. I am blogging this, as many of you may have faced the same issue.
You need to automate the below scenario. There is a link present on the Web-page, Pop-up gets opened as you click on the link & perform some action on this pop-up.
Now you may wonder what's the big deal in just automating above scenario.
I also thought in the same way but my scripts were failing.
After investigation I found that when I tried to switch to pop up it was not there,meaning till that time pop up didn't get open.
I tried to apply Thread.Sleep ,it worked fine for me. But again using Thread.Sleep can cause many issues like -
Keep automating......
You need to automate the below scenario. There is a link present on the Web-page, Pop-up gets opened as you click on the link & perform some action on this pop-up.
Now you may wonder what's the big deal in just automating above scenario.
I also thought in the same way but my scripts were failing.
After investigation I found that when I tried to switch to pop up it was not there,meaning till that time pop up didn't get open.
I tried to apply Thread.Sleep ,it worked fine for me. But again using Thread.Sleep can cause many issues like -
- This may fail if opening a pop up takes longer time
- If pop up gets open up in fraction of seconds then it will be waste of time.
- It is not the good practice to use Thread.Sleep and be last option we should think of when synchronize the browser.
private void clickWaitForPopoUp(WebDriver driver, By by,int waitTime) {
        final int currentWindows = driver.getWindowHandles().size();
        driver.findElement(by).click();
        WebDriverWait wait = new WebDriverWait(driver, waitTime);
        wait.until(new ExpectedCondition<Boolean>() {
            public Boolean apply(WebDriver d) {
                return (d.getWindowHandles().size() != currentWindows);
            }
        });
    }
Now I am calling above method and passing link and wait time when want to click and popup....Keep automating......
XPATH Basics....

XPATH Basics...
- XPath is a text syntax for locating parts of HTML document
- XPath contains a library of standard functions which helps to locate the WebElement
- XPath is a W3C recommendation
XPath uses path expressions to select WebElement or sets of WebElements in Web page. These expressions look very much like the expressions you see when you work with a traditional computer file system. like c:\MyFolder\another_folder\myFile.txt
XPATH terminologies
Nodes
While using Selenium WebDriver, we come across following three types of nodes- element
- attribute
- text
- here div, a are element nodes (element is the basically type of WebElement).
- Attribute nodes for div element is class and its value is myLink
- "a" element has text nodes as Link to Google, Link to Yahoo, Link to FaceBook
Relationship of Nodes
There are various relations available in XPATH but as a selenium user we must have knowledge of below relationsChildren
Element nodes may have zero, one or more children.above example Google Link, Yahoo Link, and FaceBook Link are Children of div tag which having class myLinks
Descendants
A node's children, children's children, etc. called as Descendants.Similarly Google Link, Yahoo Link, and FaceBook Link are Descendants of div tag which having class header
Selecting Elements
XPath uses path expressions to select nodes in an Web document. The node is selected by following a path or steps. The most useful path expressions are listed below:| Expression | Description |
|---|---|
| nodename | Selects all nodes with the name "nodename" Example div, a, input, button etc. |
| / | Selects child from the current node |
| // | Selects Descendants from the current element that match the selection no matter where they are |
| . | Selects the current node |
| .. | Selects the parent of the current node |
| @ | Selects attributes |
| Path Expression | Result |
|---|---|
| /div | Selects root level div from the whole page in above example it is div having header class |
| /div/div | Selects all div which are child of root div in above example it is div having myLinks class |
| //div | Selects all div from the page no matter where they are |
Predicates
Predicates are used to find a specific node or a node that contains a specific value.Predicates are always embedded in square brackets.
In the table below we have listed some path expressions with predicates and the result of the expressions for above examplePage Title This is a Home Page
This is a paragraph 1. read more
This is a paragraph 2. read more
This is a paragraph 3. read more
This is a paragraph 4. read more
This is a paragraph 1. and its detailed explanation
This is a paragraph 2. and its detailed explanation

This is a paragraph 3. and its detailed explanation
This is a paragraph 4. and its detailed explanation
| Path Expression | Result |
|---|---|
| /div[1] | Selects the first div element from the root that is div having id mainMenu Note: In IE 5,6,7,8,9 first node is[0], but according to W3C, it is [1]. |
| //div[@id='mainMenu']/ul/li | Selects all the li of ul which is child of div having id as mainMenu |
| //div[@id='mainMenu']/ul/li[last()] | Selects the last li from above explained list of li |
| //a[text()='Home'] | Selects all the a(anchor) having text Home |
| //div[@id='mainMenu']/ul/li[position()<3] | Selects the first two li from above explained list of li |
| position() | Matches the particular position from the list |
| last() | Matches the Last position from the list |
| text() | Get the text node of element |
| contains(string1,string2) | Matches if the string2 contains in string1 |
| starts-with(string1,string2) | Matches if the String1 starts with String2 |
| ends-with(string1,string2) | Matches if the String1 ends with String2 |
| matches(string,pattern) | Matches if the String1 match with given regular expression pattern |
| upper-case(string) | Convert the string to Uppercase |
| lower-case(string) | Convert the String to Lowercase |
Selecting Unknown Elements
XPath wildcard character * can be used to select unknown Web elements.Please contact me via cotact me page and send me queries and suggestions....
Stay cool... & Keep Automating.....
Alternate Way for sendKeys

One of my friend called me yesterday, he had an interview on Selenium WebDriver and got confused on 1 Question.
What is an alternative for sendKeys Method in WebDriver?
I also got stammered on this and thought in mindWhy the hell do we need this?
There are below possible reason that I could find, When we need any alternative to sendKeys.- When the Text element is disabled or locked, sendKeys can not set the value in text field.
(in my opinion, this is not the correct way of Automation, because the element is locked or disabled by intend to not allow any text insertion) - When we want to write huge text as input... that time the way WebDriver work, by sending Series of characters from String one by one, and Which is Very time consuming. so to minimize that time we can use this alternate method
Solution!!!
The best alternative I found is JavaScriptWay 1 to Execute Script
        WebDriver driver = new FirefoxDriver();
        driver.get("http://www.google.com");
        JavascriptExecutor myExecutor = ((JavascriptExecutor) driver);
        myExecutor.executeScript("document.getElementsByName('q')[0].value='Kirtesh';");
        driver.quit();
in above example we have used javaScript to locate the Search Textbox and set the "Kirtesh" value in it.
lets look at another approach.
Way 2
        WebDriver driver = new FirefoxDriver();
        driver.get("http://www.google.com");
        WebElement searchbox = driver.findElement(By.xpath("//input[@name='q']"));
        JavascriptExecutor myExecutor = ((JavascriptExecutor) driver);
        myExecutor.executeScript("arguments[0].value='Kirtesh';", searchbox);
        driver.quit();
second example is very controlled approach, Here we are passing WebElement as a argument to the javaScript
There is still many more remained from JavascriptExecutor ......
Keep Exploring...
Keep Automating..................
Rerun Failed JUnit Tests

Many times Selenium tests are getting failed due to no reason... as UI tests are fragile in nature.
There are many uncertainties like slow response, browser issues... and many more.
Generally we use readily available Test frameworks like JUnit & TestNG to write test cases. TestNG framework has lot off cool features like rerun test, dependency test and many more... but still many of us have JUnit as first choice.
Problem!!!!
JUnit frame work does not provide any direct feature to rerun the failed tests. So problem isHow we can rerun Failed test in JUnit?
Solution
JUnit provides a Interface TestRule, by implementing this we can apply rule for running the test. We have used same class to solve our problem, Please have a look below code snippet in which have created Class Retry which implements the TestRule interface.
import org.junit.rules.TestRule;
import org.junit.runner.Description;
import org.junit.runners.model.Statement;

/**
 * Created by Kirtesh on 20-02-2015.
 */
public class Retry implements TestRule {
    private int retryCount;

    public Retry(int retryCount) {
        this.retryCount = retryCount;
    }

    public Statement apply(Statement base, Description description) {
        return statement(base, description);
    }
    private Statement statement(final Statement base, final Description description) {
        return new Statement() {
            @Override
            public void evaluate() throws Throwable {
                Throwable caughtThrowable = null;

                // implement retry logic here
                for (int i = 0; i < retryCount; i++) {
                    try {
                        base.evaluate();
                        return;
                    } catch (Throwable t) {
                        caughtThrowable = t;

                        //  System.out.println(": run " + (i+1) + " failed");
                        System.err.println(description.getDisplayName() + ": run " + (i + 1) + " failed");
                    }
                }
                System.err.println(description.getDisplayName() + ": giving up after " + retryCount + " failures");
                throw caughtThrowable;
            }
        };
    }
}
That's it.. you can directly copy above class & use this rule in your junit test... look in to below test
    @Rule public Retry retry = new Retry(3);
    @Test
    public void myWebDriverTest(){
 driver.get(htmlPath);
 driver.findElement(By.id("user")).sendKeys("MyUser");
 driver.findElement(By.id("password")).sendKeys("myPassword");
 driver.findElement(By.id("login")).click();
 Assert.assertTrue(driver.findElements(By.linkText("Logout")).size()>0);
        driver.quit();
    }
above test will get rerun if it get fails for 3 time, 3 is the number which you can set in @Rule Retry...
Hope this may hep you.....
Keep exploring... Keep automating....
Find Broken Images in Web-Page

Hello Friends....
While testing the web-page, It always happen when page renders properly but Image/Images are not displayed due to incorrect path
Technically images which are not having correct path are called as Broken Images.
Basically Selenium help us to mimic human actions (e.g. clicking, typing, dragging, dropping, etc.)
So how do we use it to test for broken images?
Solution!!!
Selenium WebDriver is not directly equipped with this... but there are several way to do this..We will use HttpURLConnection Object with selenium to do this.We will need to go through the below steps.
- Find all images on the page
- Iterate through each image, and find the src attribute and validate with a 404 status code
- Store / Notify / Log the broken images path in a collection
HttpURLConnection Example
Please look into below code snippetimport java.net.HttpURLConnection;
import java.net.InetSocketAddress;
import java.net.Proxy;
import java.net.URL;
import java.util.ArrayList;
import java.util.List;
import org.openqa.selenium.By;
import org.openqa.selenium.WebDriver;
import org.openqa.selenium.WebElement;
import org.openqa.selenium.firefox.FirefoxDriver;
public class ImageUtills {
public static List<WebElement> getBrokenLinks(String Weburl) {
WebDriver driver = new FirefoxDriver();
driver.get(Weburl);
List<WebElement> Images = driver.findElements(By.xpath("//img"));
List<WebElement> brokenImages = new ArrayList<WebElement>();
//Use Proxy if your network is under any proxy server
Proxy proxy = new Proxy(Proxy.Type.HTTP, new InetSocketAddress("Your Proxy Server", 80));
for(WebElement image:Images){
String url= image.getAttribute("src");
try
{
//You can keep empty if there is no proxy.
HttpURLConnection http = (HttpURLConnection)new URL(url).openConnection(proxy);
if(http.getResponseCode()!=200){
brokenImages.add(image);
}
}
catch (Exception e) {
brokenImages.add(image);
e.printStackTrace();
}
}
/// You can further use brokenImages List for display or notify or assert
return brokenImages;
}
}
Below is Different Response codes and there meanings.. it may help you some where1xx: Information
| Message: | Description: |
|---|---|
| 100 Continue | The server has received the request headers, and the client should proceed to send the request body |
| 101 Switching Protocols | The requester has asked the server to switch protocols |
| 103 Checkpoint | Used in the resumable requests proposal to resume aborted PUT or POST requests |
2xx: Successful
| Message: | Description: |
|---|---|
| 200 OK | The request is OK (this is the standard response for successful HTTP requests) |
| 201 Created | The request has been fulfilled, and a new resource is created |
| 202 Accepted | The request has been accepted for processing, but the processing has not been completed |
| 203 Non-Authoritative Information | The request has been successfully processed, but is returning information that may be from another source |
| 204 No Content | The request has been successfully processed, but is not returning any content |
| 205 Reset Content | The request has been successfully processed, but is not returning any content, and requires that the requester reset the document view |
| 206 Partial Content | The server is delivering only part of the resource due to a range header sent by the client |
3xx: Redirection
| Message: | Description: |
|---|---|
| 300 Multiple Choices | A link list. The user can select a link and go to that location. Maximum five addresses |
| 301 Moved Permanently | The requested page has moved to a new URL |
| 302 Found | The requested page has moved temporarily to a new URL |
| 303 See Other | The requested page can be found under a different URL |
| 304 Not Modified | Indicates the requested page has not been modified since last requested |
| 306 Switch Proxy | No longer used |
| 307 Temporary Redirect | The requested page has moved temporarily to a new URL |
| 308 Resume Incomplete | Used in the resumable requests proposal to resume aborted PUT or POST requests |
4xx: Client Error
| Message: | Description: |
|---|---|
| 400 Bad Request | The request cannot be fulfilled due to bad syntax |
| 401 Unauthorized | The request was a legal request, but the server is refusing to respond to it. For use when authentication is possible but has failed or not yet been provided |
| 402 Payment Required | Reserved for future use |
| 403 Forbidden | The request was a legal request, but the server is refusing to respond to it |
| 404 Not Found | The requested page could not be found but may be available again in the future |
| 405 Method Not Allowed | A request was made of a page using a request method not supported by that page |
| 406 Not Acceptable | The server can only generate a response that is not accepted by the client |
| 407 Proxy Authentication Required | The client must first authenticate itself with the proxy |
| 408 Request Timeout | The server timed out waiting for the request |
| 409 Conflict | The request could not be completed because of a conflict in the request |
| 410 Gone | The requested page is no longer available |
| 411 Length Required | The "Content-Length" is not defined. The server will not accept the request without it |
| 412 Precondition Failed | The precondition given in the request evaluated to false by the server |
| 413 Request Entity Too Large | The server will not accept the request, because the request entity is too large |
| 414 Request-URI Too Long | The server will not accept the request, because the URL is too long. Occurs when you convert a POST request to a GET request with a long query information |
| 415 Unsupported Media Type | The server will not accept the request, because the media type is not supported |
| 416 Requested Range Not Satisfiable | The client has asked for a portion of the file, but the server cannot supply that portion |
| 417 Expectation Failed | The server cannot meet the requirements of the Expect request-header field |
5xx: Server Error
| Message: | Description: |
|---|---|
| 500 Internal Server Error | A generic error message, given when no more specific message is suitable |
| 501 Not Implemented | The server either does not recognize the request method, or it lacks the ability to fulfill the request |
| 502 Bad Gateway | The server was acting as a gateway or proxy and received an invalid response from the upstream server |
| 503 Service Unavailable | The server is currently unavailable (overloaded or down) |
| 504 Gateway Timeout | The server was acting as a gateway or proxy and did not receive a timely response from the upstream server |
| 505 HTTP Version Not Supported | The server does not support the HTTP protocol version used in the request |
| 511 Network Authentication Required | The client needs to authenticate to gain network access |
Hope you learn something from this post...
Keep Automating........
Running Tests with Apache Ant

Hello friends,
Today we will see, how we can run our unit tests with Apache Ant.
before that.... Why we need this?
It's Very bulky to run your test from various Java class within various packages through IDE (Eclipse, Intellij-Idea), specially when it is daily activity. Its also become very important when you want to integrate your tests in CI process (Continuous Integration). it means your test will get trigged after each build.
Here Ant helps us to run the test in a single click or one command
ANT is software build automating tool for Java code. It uses XML file named build.xml as the input, and run accordingly.
We can configure different Unit test framework like J-UNIT & Test-NG in Apache Ant
Lets get started step by step
-
The very first step is to Download and install Apache Ant. You can download latest Apache Ant form here
Its very simple to install, just uncompress it on hard drive and add the System Variable as "ANT_HOME" to the directory you uncompressed Ant. also add %ANT_HOME%/bin to your PATH variable.
Please check this to learn how to set System variable
As I mentioned build.xml file is input for Ant, Lets see how we can create this file
Very basic duild.xml file template is as below. We will start with this
<?xml version="1.0"?>
  <project name="Services Automation" default="test">
    <target name="test">
        <echo>Hello Ant</echo>
    </target>
</project>
Create new build.xml file at root level of your test project. below is my project structure
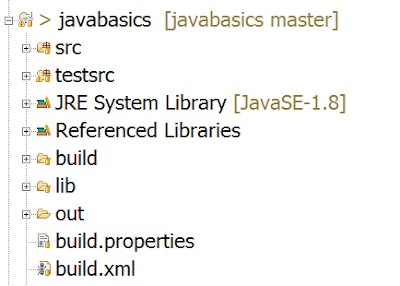
There are two source folders in my Project(src, testsrc), you may have different project structure
build.xml has project tag on root level which consist of target nodes, these are one or many as per requirement. each target has unique name attribute, in our case it is "test".
Project tag has default attribute having value from any of the target name attribute. by this we can set the default target to execute
Lets get in to detail.. Which steps we need to take for executing unit test?
- Create the folder structure we needed
- Compile the Java code which we have written for build the tests
- Create jar file from compiled code, which will used for executing tests
- Run the desired test
- Create the test Report
Lets Implement all above steps in build.xml file
-
First Step is to create/Initialize the folder structure, we need to add target named init in project and create required folders, please look below target
<target name="clean" >
 <mkdir dir="out"/>
 <mkdir dir="reports"/>
 <mkdir dir="out"/>
 <mkdir dir="build"/>
 <delete verbose="true">
  <fileset dir="out" includes="**/*.class" />
  <fileset dir="build" includes="**/*.*" />
  <fileset dir="reports" includes="**/*.*" />
 </delete>
</target>
Here mkdir used for creating the directory at relative path & delete used for deleting the existing files
-
Now our next target will be, Compile the code.
to compile the code, all dependency jars should available in lib folder, and used as reference for compile
in ant we use javac tag to compile the source to make binary class files. We use path tag to store dependency class-paths
Please have a look in below target of javac
<path id="classpath.test">
 <pathelement location="lib/junit-4.11.jar" />
 <pathelement location="lib/hamcrest-core-1.3.jar" />
 <pathelement location="src" />
</path>
<target name="compile" depends="clean">
 <javac srcdir="src" destdir="out" verbose="true">
  <classpath refid="classpath.test"/>
 </javac>
 <jar destfile="build/myJar.jar" basedir="out">
 </jar>
</target>
We use jar tag to make the jar from compiled binaries.
Now we have jar file ready in build folder & we are all set to run the tests, we use junit tag to run the test please have a look in to below bit of xml
<path id="junitTest"> <pathelement location="build/myJar.jar"/> <pathelement location="lib/junit-4.11.jar" /> <pathelement location="lib/hamcrest-core-1.3.jar" /> </path> <target name="test" depends="compile"> <junit showoutput="true"> <classpath refid="junitTest" /> <formatter type="xml" usefile="true"/> <batchtest todir="reports"> <fileset dir="source"> <include name="**/*Test*" /> </fileset> </batchtest> </junit> </target>-
We are done with test execution target. and time is to build reports. in above junit target we have already stored our raw xml out put in reports folder through formatter.
to generate HTML report we use junitreport tag with inputs. please look into below xml snippet
<target name="report" depends="test">
 <mkdir dir="reports/html" />
 <junitreport todir="reports">
  <fileset dir="reports">
   <include name="TEST-*.xml" />
  </fileset>
  <report todir="reports/html" />
 </junitreport>
</target>
-
Finally we done with all target and ready to run the test through command prompt or integrate the test to CI environment. before that just look at whole build.xml file
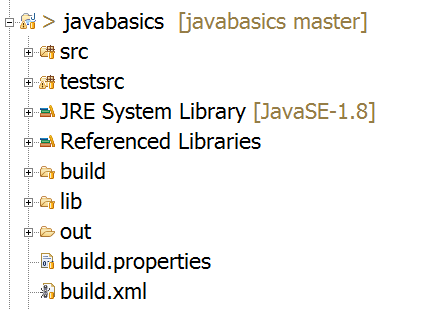
<?xml version="1.0"?>
<project name="Services Automation" default="test">

 <target name="clean" >
  <mkdir dir="out"/>
  <mkdir dir="reports"/>
  <mkdir dir="out"/>
  <mkdir dir="build"/>
  <delete verbose="true">
   <fileset dir="out" includes="**/*.class" />
   <fileset dir="build" includes="**/*.*" />
   <fileset dir="reports" includes="**/*.*" />
  </delete>
 </target>


 <path id="classpath.test">
  <pathelement location="lib/junit-4.11.jar" />
  <pathelement location="lib/hamcrest-core-1.3.jar" />
  <pathelement location="src" />
 </path>
 <target name="compile" depends="clean">
  <javac srcdir="src" destdir="out" verbose="true">
   <classpath refid="classpath.test"/>
  </javac>
  <jar destfile="build/myJar.jar" basedir="out">
  </jar>
 </target>

 <path id="junitTest">
  <pathelement location="build/myJar.jar"/>
  <pathelement location="lib/junit-4.11.jar" />
  <pathelement location="lib/hamcrest-core-1.3.jar" />
 </path>
 <target name="test" depends="compile">
  <junit showoutput="true">
   <classpath refid="junitTest" />
   <formatter type="xml" usefile="true"/>
   <batchtest todir="reports">
    <fileset dir="source">
     <include name="**/*Test*" />
    </fileset>
   </batchtest>
  </junit>
 </target>

 <target name="report" depends="test">
  <mkdir dir="reports/html" />
  <junitreport todir="reports">
   <fileset dir="reports">
    <include name="TEST-*.xml" />
   </fileset>
   <report todir="reports/html" />
  </junitreport>
 </target>

</project>
Here we Go...............
To run the test... open command prompt to the root folder of your project where build.xml is saved and just type command ant and you are done.......
Note above build.xml file is written as per shown project structure. it may vary as if on different project and structures.
Keep Automating.............
Handling HTML Form Elements.

Almost in every web application, we inputs some values, Selects Options/Checkbox clicks on links/buttons etc through html elements and submit the page and save/retrieve values.
Today we will see how to interact with all these HTML elements (Web Controls).
WebDriver treats all those elements as a same that is WebElement.
below is the list of web controls and their HTML Syntax.
to check the element is enabled we use isEnabled() Method
Check the below code
to clear the text from elements we can use clear()
please check below code
to verify the CheckBox is checked we use .isSelected() Method
to select & verify selected Radio buttons, same methods are used
to select the specific option from Combo Box & Multi Select ListBox Selenium WebDriver provides Special class org.openqa.selenium.support.ui.Select
Below is code snippet which use to select single or multiple options.
Select class also provide other useful methods to interact with List and combo
getFirstSelectedOption() returns the first selected element from the list
getAllSelectedOptions() returns List of WebElement which are selected
Note: Other then Visible text there are also methods available for index & value attribute
Keep Exploring... & Keep Automating......
Today we will see how to interact with all these HTML elements (Web Controls).
WebDriver treats all those elements as a same that is WebElement.
below is the list of web controls and their HTML Syntax.
| Name | HTML Syntax | Control |
|---|---|---|
| Hyper Link | <a href="#">Link</a> |
My Simple Link |
| Text Box | <input type="text" value="Some Text"/> |
|
| Password | <input type="password" value="somepass"/> |
|
| Multiline Textbox | <textarea>Firstline Secondline </textarea> |
|
| Checkbox | <input name="check1" type="checkbox"/>checkbox 1
<input name="check2" type="checkbox"/>checkbox 2
|
checkbox 1 checkbox 2 |
| Radio Button | <input name="options" type="radio" value="Option1" />Option 1 <input name="options" type="radio" value="Option2" />Option 2 | Option 1 Option 2 |
| Input Button | <input type="button" value="Click Me" id="myInpButton" /> | |
| Button | <button id="myButton">Click Me</button> | |
| Submit Button | <input type="Submit" id="mySubmit" /> | |
| Combo Box | <select>
<option>Value 1</option>
<option>Value 2</option>
<option>Value 3</option>
</select>
| |
| Multi Select ListBox | <select multiple="multiple" size="5"> <option>Value 1</option> <option>Value 2</option> <option>Value 3</option> <option>Value 4</option> <option>Value 5</option> </select> |
Click Elements :
Below elements are generally used for Click interaction, also many time we need to verify element is enabled / disabled- Hyper Link
- Input Button
- Button
- Submit Button
to check the element is enabled we use isEnabled() Method
Check the below code
  WebDriver driver = new FirefoxDriver();
  driver.get("http://seleniumbyneeds.blogspot.in/2015/01/handling-various-html-form-elements.html");
  // Click on Button
  driver.findElement(By.id("button")).click();
  // Verify input button enabled if yes click on it
  if(driver.findElement(By.id("inpButton")).isEnabled()){
    driver.findElement(By.id("inpButton")).click();
  }
  // Click on link by selecting by link text
  driver.findElement(By.linkText("My Simple Link")).click();
Text Elements
Below elements used to enter text/numbers/words- Text Box
- Password
- Multiline Textbox
to clear the text from elements we can use clear()
please check below code
  WebDriver driver = new FirefoxDriver();
  driver.get("http://seleniumbyneeds.blogspot.in/2015/01/handling-various-html-form-elements.html");
  // Enter the text in text box
  driver.findElement(By.id("tbox")).sendKeys("Hello there");
  // print the text from text tbox
  System.out.println(driver.findElement(By.id("tbox")).getAttribute("value"));
  // enter the text in multi line text box
  driver.findElement(By.id("tarea")).sendKeys("here comes line 1\nhere comes line 2");
  // print the text from multi line text tbox
  System.out.println(driver.findElement(By.id("tarea")).getText());
  // Clear the password field
  driver.findElement(By.id("pass")).clear();
Selection Elements
Here in this category we get multiple options to select from them, below is the list of selection elements- Checkbox
- Radio Button
- Combo Box
- Multi Select ListBox
to verify the CheckBox is checked we use .isSelected() Method
to select & verify selected Radio buttons, same methods are used
to select the specific option from Combo Box & Multi Select ListBox Selenium WebDriver provides Special class org.openqa.selenium.support.ui.Select
Below is code snippet which use to select single or multiple options.
WebDriver driver = new FirefoxDriver();
  driver.get("http://seleniumbyneeds.blogspot.in/2015/01/handling-various-html-form-elements.html");
  //Check the checkbox
  driver.findElement(By.name("check1")).click();
  //Check the checkbox 2 if it is not checked
  if(driver.findElement(By.name("check2")).isSelected()){
     driver.findElement(By.name("check2")).click();
  }
  // select the option Value 2 from combo box
  // 1. Convert WebElement to Select
  // 2. Select the desired option
  Select comboBox = new Select(driver.findElement(By.id("myCombo")));
  comboBox.selectByVisibleText("Value 2");
  //
  // Multi select from the list
  //
  Select listBox = new Select(driver.findElement(By.id("myCombo")));
  listBox.selectByVisibleText("Value 1");
  listBox.selectByVisibleText("Value 2");
  //
  // deselect the specific item
  //
  listBox.deselectByValue("Value 1");
  //
  // De-select all the items from the list
  //
  listBox.deselectAll();
Select class also provide other useful methods to interact with List and combo
getFirstSelectedOption() returns the first selected element from the list
getAllSelectedOptions() returns List of WebElement which are selected
Note: Other then Visible text there are also methods available for index & value attribute
Keep Exploring... & Keep Automating......
Selecting Date on JQuery Datepicker
Hello Friends,
In this post we will see how to select specific date in JQuery Datepicker.
Its very easy to enter date as text by .sendKeys() method, but mostly when application uses JQuery Datepicker, it disables typing on the text-box. the text-box sets to read only.
While automating such screens we need to write logic which can interact with Datepicker and selects desired date.

Consider below example of Datepicker.
Html code for above example is
To automate this, we first break apart a problem.
Lets implement the above logic.
Note: we have used Joda Date Time Library for calculate date and time difference
Hope this will help you.... you can directly use above code if your application is using JQuery Datepicker. Keep automating......
In this post we will see how to select specific date in JQuery Datepicker.
Its very easy to enter date as text by .sendKeys() method, but mostly when application uses JQuery Datepicker, it disables typing on the text-box. the text-box sets to read only.
While automating such screens we need to write logic which can interact with Datepicker and selects desired date.
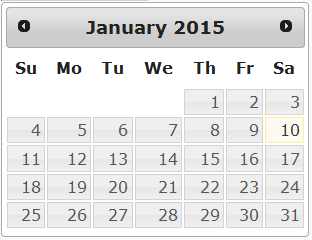
Consider below example of Datepicker.
Html code for above example is
To automate this, we first break apart a problem.
- Decide which date we want to set
- Read the current date from datepicker
- Calculate difference between both dates in Months(difference will positive in case of set date is in future respective to current date & will negative when set date is in past respective to current date of datepicker)
- Set loop depends on month difference and navigate the datepicker to specific month
- Select the Day.
Lets implement the above logic.
Note: we have used Joda Date Time Library for calculate date and time difference
 SimpleDateFormat myDateFormat = new SimpleDateFormat("dd/MM/yyyy");
  SimpleDateFormat calDateFormat = new SimpleDateFormat("MMMM yyyy");
  Date setDate=myDateFormat.parse("15/08/2014");
  WebDriver driver = new FirefoxDriver();
  driver.get("http://seleniumbyneeds.blogspot.in/2015/01/selecting-date-on-jquery-datepicker.html");
  // Switch to frame where the Menu Example is loaded
  driver.switchTo().frame(driver.findElement(By.id("myFiddler"))).switchTo().frame(0);
  driver.findElement(By.id("datepicker")).click();
  Date curDate = calDateFormat.parse(driver.findElement(By.className("ui-datepicker-title")).getText());
  // Joda org.joda.time.Months class to calculate difference
  // to do this converted Date to joda DatTime
  int monthDiff = Months.monthsBetween(new DateTime(curDate).withDayOfMonth(1), new DateTime(setDate).withDayOfMonth(1)).getMonths();
  boolean isFuture = true;
  // decided whether set date is in past or future
		if(monthDiff<0){
			isFuture = false;
			monthDiff*=-1;
		}
		// iterate through month difference
		for(int i=1;i<=monthDiff;i++){
			driver.findElement(By.className("ui-datepicker-" + (isFuture?"next":"prev"))).click();
		}
		// Click on Day of Month from table
		driver.findElement(By.xpath("//table[@class='ui-datepicker-calendar']//a[text()='" + (new DateTime(setDate).getDayOfMonth()) + "']")).click();
Hope this will help you.... you can directly use above code if your application is using JQuery Datepicker. Keep automating......
Handling Dates in Java

Date is one of the Important Variable type in Java,
Generally we use following actions with Dates while Automating the application
Note: If ‘M’ is 3 or more, then the month is interpreted as text, else number
Example 1:
Fri Jun 07 00:00:00 MYT 2013
07-Jun-2013
in above case we have String dateString in format dd-MMM-yyyy, so to convert the String to Date in given format we have Created Object formatter of Class SimpleDateFormat.
This class provides various methods but for now out of that parse and format are important for us
31/Oct/2013
In Example 2, we are converting the format of the given Date String by using separate SimpleDateFormat for parsing and formatting.
To compare dates we use Date.compareTo(), this is the classic method to compare dates in Java. the method returns the results as follows.
The best way to get difference between two dates is to get difference in milliseconds and convert them in to required format(days, hours, min, seconds)
hope this will help you some where....
Keep Automating..
1) Read and Write date in Different Format
When we read date from browser, it is String type Variable. which is not suitable for perform date like operation. so that we need to convert the string to Date
We can convert the string to date using SimpleDateFormat
Below is different patterns used
| Letter | Description | Examples |
| y | Year | 2013 |
| M | Month in year | July, 07, 7 |
| d | Day in month | 1-31 |
| E | Day name in week | Friday, Sunday |
| a | Am/pm marker | AM, PM |
| H | Hour in day | 0-23 |
| h | Hour in am/pm | 1-12 |
| m | Minute in hour | 0-60 |
| s | Second in minute | 0-60 |
Example 1:
 SimpleDateFormat formatter = new SimpleDateFormat("dd-MMM-yyyy");
 String dateString = "07-Jun-2013";
  try {
    Date date = formatter.parse(dateInString);
    System.out.println(date);
    System.out.println(formatter.format(date));
 }
  catch (ParseException e) {
  e.printStackTrace();
 }
Output:
Fri Jun 07 00:00:00 MYT 2013
07-Jun-2013
in above case we have String dateString in format dd-MMM-yyyy, so to convert the String to Date in given format we have Created Object formatter of Class SimpleDateFormat.
This class provides various methods but for now out of that parse and format are important for us
Example 2:
- parse Method takes String in argument and returns Date Object
- format Method takes Date in argument and returns formatted String
 SimpleDateFormat formatter = new SimpleDateFormat("dd-MM-yyyy");
 SimpleDateFormat parser = new SimpleDateFormat("dd/MMM/yyyy");
 String dateString = "31-10-2013";
  try {
    Date date = formatter.parse(dateInString);
    System.out.println(parser.format(date));
 }
  catch (ParseException e) {
  e.printStackTrace();
 }
Output:
31/Oct/2013
In Example 2, we are converting the format of the given Date String by using separate SimpleDateFormat for parsing and formatting.
2) Compare Dates
To compare dates we use Date.compareTo(), this is the classic method to compare dates in Java. the method returns the results as follows.
- Return value is 0 if both dates are equal.
- Return value is greater than 0 , if Date is after the date argument.
- Return value is less than 0, if Date is before the date argument.
try{
  SimpleDateFormat sdf = new SimpleDateFormat("yyyy-MM-dd");
  Date date1 = sdf.parse("2009-12-31");
  Date date2 = sdf.parse("2010-01-31");
  System.out.println(sdf.format(date1));
  System.out.println(sdf.format(date2));
  if(date1.compareTo(date2)>0){
    System.out.println("Date1 is after Date2");
  }else if(date1.compareTo(date2)<0){
    System.out.println("Date1 is before Date2");
  }else if(date1.compareTo(date2)==0){
    System.out.println("Date1 is equal to Date2");
  }else{
    System.out.println("How to get here?");
  }
  }catch(ParseException ex){
 ex.printStackTrace();
}
3) Find Difference between two dates
The best way to get difference between two dates is to get difference in milliseconds and convert them in to required format(days, hours, min, seconds)
- 1000 milliseconds = 1 second
- 60 seconds = 1 minute
- 60 minutes = 1 hour
- 24 hours = 1 day
String dateStart = "01/14/2012 09:29:58";
String dateStop = "01/15/2012 10:31:48";

  //HH converts hour in 24 hours format (0-23), day calculation
SimpleDateFormat format = new SimpleDateFormat("MM/dd/yyyy HH:mm:ss");

Date d1 = null;
Date d2 = null;

try {
  d1 = format.parse(dateStart);
  d2 = format.parse(dateStop);

   //in milliseconds
  long diff = d2.getTime() - d1.getTime();

  long diffSeconds = diff / 1000 % 60;
  long diffMinutes = diff / (60 * 1000) % 60;
  long diffHours = diff / (60 * 60 * 1000) % 24;
  long diffDays = diff / (24 * 60 * 60 * 1000);

  System.out.print(diffDays + " days, ");
  System.out.print(diffHours + " hours, ");
  System.out.print(diffMinutes + " minutes, ");
  System.out.print(diffSeconds + " seconds.");

}
catch (Exception e)
{
  e.printStackTrace();
}
hope this will help you some where....
Keep Automating..
Using Actions Class to perform user actions
Hello Friends....
Today we will see how to handle series of events with Selenium WebDriver.
Now you will have question What is Series of events or actions and Where do I need while automating the application?

Have a look in below menu, having 2 Levels of sub menu.
below is the source HTML of the page
<ul class="top">
    <li><a href="#">Menu1</a></li>
    <li><a href="#">Menu2 >></a>
        <ul class="sub">
            <li><a href="#">SubMenu1</a></li>
            <li> <a href="#">SubMenu2 >></a>

                <ul class="sub">
                    <li><a target="_blank" href="http://www.google.com">Link to Google</a>
                    </li>
                    <li><a href="http://facebook.com">Link to Facebook</a>

                    </li>
                </ul>
            </li>
            <li><a href="#">SubMenu3</a>

            </li>
        </ul>
    </li>
    <li><a href="#">Menu3</a>
    </li>
</ul>
I want to click on menu Menu2 >> SubMenu2 >> Link to Google
if we execute below code.
    /***
     *Initializing WebDriver to FirefoxDriver
    ***/
    WebDriver driver = new FirefoxDriver();
    driver.get("http://seleniumbyneeds.blogspot.in/2015/01/using-actions-to-hover-on-menu.html");

    // Switch to frame where the Menu Example is loaded
    driver.switchTo().frame(driver.findElement(By.id("myFiddler"))).switchTo().frame(0);

//Clicking in Link
driver.findElement(By.partialLinkText("Google")).click();
By executing above code we will get below error message. Because link to Google is not directly visible.
Caused by: org.openqa.selenium.NoSuchElementException: Unable to locate element: {"method":"partial link text","selector":"Google"}
to get the link visible we need 2 actions
to simulate all above actions we will need Actions, this class provides lot of user actions and gestures which simulates the user interactions and events.
- Hover on Menu2, which will display SubMenu2
- Hover on SubMenu2, which will expose or display Link to Google
- and after that we click on link to Google
see below code which uses Actions class to perform above mentioned actions to click on Google Link
  WebDriver driver = new FirefoxDriver();
  driver.get("http://seleniumbyneeds.blogspot.in/2015/01/using-actions-to-hover-on-menu.html");

// Switch to frame where the Menu Example is loaded
  driver.switchTo().frame(driver.findElement(By.id("myFiddler"))).switchTo().frame(0);

//initializing object from Class org.openqa.selenium.interactions.Actions
 Actions myActionBuilder = new Actions(driver);
//hover on Menu2
  myActionBuilder.moveToElement(driver.findElement(By.partialLinkText("Menu2"))).build().perform();
//hover on SubMenu2
  myActionBuilder.moveToElement(driver.findElement(By.partialLinkText("SubMenu2"))).build().perform();
//click on link
  myActionBuilder.moveToElement(driver.findElement(By.partialLinkText("Google"))).click().build().perform();
Here in this example we have used moveToElement action, which triggers the hover event on the given WebElement.
Now lets see drag and drop example in Actions

Have a look in below Example, in this we need to drag first block to second block
below is the html source of the example.
to perform drag and drop operation we will need below code.
  WebDriver driver = new FirefoxDriver();
  driver.get("http://seleniumbyneeds.blogspot.in/2015/01/using-actions-to-hover-on-menu.html");
  driver.switchTo().frame(driver.findElement(By.id("myDragFiddler"))).switchTo().frame(0);
  Actions myActionBuilder = new Actions(driver);
  myActionBuilder.dragAndDrop(driver.findElement(By.id("draggable")), driver.findElement(By.id("droppable"))).build().perform();
Like above both examples we can do lot of actions with Actions class, just play around and explore the things.Keep Automating.....
Selenium WebDriver WebElement Selectors
Hello friends..
This would be very besic topic for experianced people, but may help WebDriver new bees.
Basically whenever we interacting with Browser Application through WebDriver, we always need to identify the web-elements like Text-Box, Buttons, List, Dropdown, Menu, Link, Checkbox.. etc.
We use FindWebElement / FindWebElements method to locate/find Web-Elements, with different selectors.
But I will also like to mention here that as a Web-Application Tester, we should have basic knowledge of HTML & CSS, which definitely help us to take judgement on selectors to find the Web-Elements.
Please go through below links to learn HTML / CSS
HTML Tutorials
CSS Tutorials
Please go through below links to learn HTML / CSS
HTML Tutorials
CSS Tutorials
Below is the list of selectors provided by WebDriver.
- By.className
- By.cssSelector
- By.id
- By.linkText
- By.name
- By.partialLinkText
- By.tagName
- By.xpath
Today i am going to explain some of the listed selectors.
By.className
This Method takes Class Name as String and Finds elements based on the value of the "class" attribute of the web element.
If an element has many classes then this will match against each of them.
For example if the value is "one two onone", then the following "className" will match: "one" and "two"
Have a look at below html snippet which may present on any Web Page
<div class="displaydiv"> <div class="boldText">My List Items</div> <ul> <li> <div class="boldText listItem">First Item</div> </li> <li> <div class="boldText listItem">Second Item</div> </li> <li> <div class="boldText listItem">Third Item</div> </li> <li> <div class="boldText listItem">Fourth Item</div> </li> <li> <div class="boldText listItem">Fifth Item</div> </li> </ul> </div> If we want to select all list items from the list, by using ByClassName Selector, we should use class "listItem" because "bolderText" class is also applied to List header.
So in this case our WebDriver selector statement will look as follow
we can also use below syntax if we have the single list in whole web page
here selector finds div whch are chield of li directly by tag name of web element
By.id selector selects the element having specified id and similarly By.name selectors selects the web element having specified name.
it will point to all links, as all links are having text "Link", but as we are using .findWebElement so it will point to first link in DOM, that is link to www.google.com
<div class="displaydiv"> <div class="boldText">My List Items</div> <ul> <li> <div class="boldText listItem">First Item</div> </li> <li> <div class="boldText listItem">Second Item</div> </li> <li> <div class="boldText listItem">Third Item</div> </li> <li> <div class="boldText listItem">Fourth Item</div> </li> <li> <div class="boldText listItem">Fifth Item</div> </li> </ul> </div> If we want to select all list items from the list, by using ByClassName Selector, we should use class "listItem" because "bolderText" class is also applied to List header.
So in this case our WebDriver selector statement will look as follow
1 List<WebElement> listItems = driver.findElements(By.className("listItem")); |
By.cssSelector
While using CssSelector we should know basics of Cascaded Style Sheets.
Please go through below links to learn HTML / CSS
HTML Tutorials
CSS Tutorials
Let's have some basics on the css.
Please go through below links to learn HTML / CSS
HTML Tutorials
CSS Tutorials
Let's have some basics on the css.
- .(dot) is used for selecting the elemnts having the specified css class
- #(hash) is used for selecting the element having specified Id
- we can directly add Tag Name to select all the specified tags in the web page.
1 List<WebElement> listItems = driver.findElements(By. |
we can also use below syntax if we have the single list in whole web page
1 List<WebElement> listItems = driver.findElements(By.cssSelector("li div")); |
here selector finds div whch are chield of li directly by tag name of web element
By.id &By.name
These two selectors are quite simple and straight forward as they are.By.id selector selects the element having specified id and similarly By.name selectors selects the web element having specified name.
By.linkText
This Selector used to select the anchors(Links) from the web-page.
It selects the link on the basis of the text contains by the link. consider below HTML snippet
<div>
<a id='myLink' href='http://www.google.com'> Link to Google</a><br/>
<a id='myLink' href='http://www.yahoo.com'> Link to Yahoo</a><br/>
<a id='myLink' href='http://www.rediff.com'> Link to Rediff</a>
</div>
above code will render on web-page like below
Now to click the link of www.yahoo.com with linkText selector below statement needed
1 driver.findElement(By.linkText("Link to Yahoo")).click(); |
By.partialLinkText
As selector name it self suggests, it can select the Anchors(Links) by it's partial text.
lets consider previous HTML snippet, if i want to select any link with partialLinkText selector, I need to give partial text of the link, check below snippet which will select the www.google.com link
1 driver.findElement(By.partialLinkText("Google")).click(); |
if I write below statement.
1 driver.findElement(By.partialLinkText("Link")).click(); |
it will point to all links, as all links are having text "Link", but as we are using .findWebElement so it will point to first link in DOM, that is link to www.google.com
By.tagName
continued....
Subscribe to:
Posts (Atom)